First Spring MVC application tutorial
Introduction
In this tutorial we will create a simple Spring MVC application. We will create a Controller that will handle an HTTP request and then will choose a view to present useful information to the end-user as a web page.
This tutorial considers the following software and environment:
- Ubuntu 12.04
- Maven 3.0.4
- JDK 1.7.0.09
- Spring 3.2.0
- Tomcat 7.0.35
Configure Maven to get the required Spring dependencies:
<project xmlns="http://maven.apache.org/POM/4.0.0"
  xmlns:xsi="http://www.w3.org/2001/XMLSchema-instance"
  xsi:schemaLocation="http://maven.apache.org/POM/4.0.0
  http://maven.apache.org/xsd/maven-4.0.0.xsd">

  <modelVersion>4.0.0</modelVersion>

  <groupId>com.byteslounge.spring.mvc</groupId>
  <artifactId>com-byteslounge-spring-mvc</artifactId>
  <version>1.0-SNAPSHOT</version>
  <packaging>war</packaging>

  <name>com-byteslounge-spring-mvc</name>
  <url>http://maven.apache.org</url>

  <properties>
    <project.build.sourceEncoding>UTF-8</project.build.sourceEncoding>
    <!-- Define Spring version as a constant -->
    <spring.version>3.2.0.RELEASE</spring.version>
  </properties>

  <dependencies>

    <dependency>
      <groupId>org.springframework</groupId>
      <artifactId>spring-core</artifactId>
      <version>${spring.version}</version>
    </dependency>

    <dependency>
      <groupId>org.springframework</groupId>
      <artifactId>spring-web</artifactId>
      <version>${spring.version}</version>
    </dependency>

    <dependency>
      <groupId>org.springframework</groupId>
      <artifactId>spring-webmvc</artifactId>
      <version>${spring.version}</version>
    </dependency>

  </dependencies>
</project>
A simple Model
Let's define a simple User class as the model for this example:
package com.byteslounge.spring.mvc.model;

public class User {

  private String name;
  private String message;

  public User(String name, String message) {
    this.name = name;
    this.message = message;
  }

  public String getMessage() {
    return message;
  }

  public String getName() {
    return name;
  }

}
A simple Controller
Now we define a controller:
package com.byteslounge.spring.mvc.controller;

import org.springframework.stereotype.Controller;
import org.springframework.web.bind.annotation.RequestMapping;
import org.springframework.web.bind.annotation.RequestMethod;
import org.springframework.web.servlet.ModelAndView;

import com.byteslounge.spring.mvc.model.User;

@Controller
public class ExampleController {

  @RequestMapping(method = RequestMethod.GET, value="/example")
  public ModelAndView hello(){
    User user = new User("John Doe", "Some random message");
    return new ModelAndView("hello", "user", user);
  }

}
We annotate our Controller with @Controller so the Spring container knows that this class represents a Spring MVC controller, ie. it will handle HTTP requests. Method hello is annotated with @RequestMapping and the annotation values configure this method as handling requests which URL matches /example and the used HTTP method is GET. We are initializing a User object and returning a ModelAndView instance. The parameters passed to the ModelAndView constructor mean that we are selecting a view named "hello" and passing the user object that will be referred as "user" in the view. We will see later how to glue all the pieces together.
A simple View
Now we define a view to present the output to the end-user as a web page:
<!DOCTYPE html>
<html xmlns="http://www.w3.org/1999/xhtml">
<head>
<meta http-equiv="Content-Type" content="text/html; charset=UTF-8" />
<title>Spring MVC Hello World</title>
</head>
<body>
  <div>Hello ${user.name}</div>
  <div>Your personal message is: ${user.message}</div>
</body>
</html>
/WEB-INF/views/hello.jsp
Here we are accessing the properties of the user object passed to the view by the Controller, as we have seen in the previous section. Note that we are referencing the user object as user as we have also defined in the Controller. The view is named hello.jsp, the name of the view that we also defined in the Controller output. We will see later how the Spring container translates hello to /WEB-INF/views/hello.jsp.
DispatcherServlet configuration
The request processing in Spring MVC is orchestrated by the DispatcherServlet. Let's define a configuration file:
<beans xmlns="http://www.springframework.org/schema/beans"
 xmlns:context="http://www.springframework.org/schema/context"
 xmlns:xsi="http://www.w3.org/2001/XMLSchema-instance"
 xsi:schemaLocation="http://www.springframework.org/schema/beans
 http://www.springframework.org/schema/beans/spring-beans-3.2.xsd
 http://www.springframework.org/schema/context
 http://www.springframework.org/schema/context/spring-context-3.2.xsd">

 <context:component-scan base-package="com.byteslounge.spring.mvc.controller" />

 <bean
  class="org.springframework.web.servlet.view.InternalResourceViewResolver">
  <property name="prefix">
   <value>/WEB-INF/views/</value>
  </property>
  <property name="suffix">
   <value>.jsp</value>
  </property>
 </bean>

</beans>
Things to note in the configuration file: component-scan element tells the Spring container to look for managed components in package com.byteslounge.spring.mvc.controller. This package is where we placed our Controller. InternalResourceViewResolver is the view resolver that will fetch the correct view based on the Controller output. We define the prefix and the suffix that will be used by the resolver - together with the Controller output - to fetch the correct view: hello is translated to /WEB-INF/views/hello.jsp
/WEB-INF/spring-mvc-servlet.xml
Web application configuration
Now we define our web application configuration in web.xml:
<?xml version="1.0" encoding="UTF-8"?>
<web-app xmlns:xsi="http://www.w3.org/2001/XMLSchema-instance"
  xmlns="http://java.sun.com/xml/ns/javaee"
  xmlns:web="http://java.sun.com/xml/ns/javaee/web-app_2_5.xsd"
  xsi:schemaLocation="http://java.sun.com/xml/ns/javaee
  http://java.sun.com/xml/ns/javaee/web-app_3_0.xsd"
  id="WebApp_ID"
  version="3.0">

  <display-name>Spring MVC Hello World</display-name>

  <servlet>
    <servlet-name>spring-mvc</servlet-name>
    <servlet-class>org.springframework.web.servlet.DispatcherServlet</servlet-class>
    <load-on-startup>1</load-on-startup>
  </servlet>

  <servlet-mapping>
    <servlet-name>spring-mvc</servlet-name>
    <url-pattern>*.html</url-pattern>
  </servlet-mapping>

  <context-param>
    <param-name>contextConfigLocation</param-name>
    <param-value>/WEB-INF/spring-mvc-servlet.xml</param-value>
  </context-param>

</web-app>
Things to note: We define all requests that terminate in .html to be handled by the already mentioned Spring MVC DispatcherServlet. We also tell the Spring container that
/WEB-INF/spring-mvc-servlet.xml file (the file we defined in the previous section) contains relevant configuration items.
Testing
Let's test our application. We build the war file and call it - for example - springmvc.war. When we deploy the war file in Tomcat and access:
http://localhost:8080/springmvc/example.html
we will see the following output:
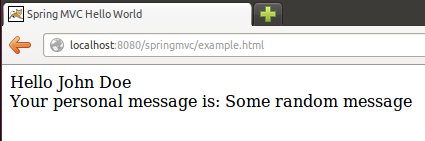
And that's it. The tutorial source code is available for download at the end of this page.