JAAS form based authentication in Tomcat example
Introduction
This tutorial will show you how to configure JAAS form based authentication in Tomcat. It will be the second part of other tutorial also available in this website: JAAS authentication in Tomcat example. Some details are similar to the first part, like the Principals and the LoginModule implementation so all the Java classes we created in the first tutorial will be omitted from this second part. We will now focus in the form based authentication configuration itself.
The following software and environment was considered:
- Ubuntu 12.04
- JDK 1.7.0.09
- Tomcat 7.0.35
Web application configuration
In order to enable form based authentication we need to configure some entries in our application web.xml file. Let's see the most relevant parts:
<security-constraint>
  <web-resource-collection>
    <web-resource-name>Admin</web-resource-name>
    <url-pattern>/admin/*</url-pattern>
  </web-resource-collection>
  <auth-constraint>
    <role-name>admin</role-name>
  </auth-constraint>
</security-constraint>

<security-role>
  <role-name>admin</role-name>
</security-role>

<login-config>
  <auth-method>FORM</auth-method>
  <form-login-config>
    <form-login-page>/login.html</form-login-page>
    <form-error-page>/error.html</form-error-page>
  </form-login-config>
</login-config>
The security-constraint and the security-role elements were already explained in detail in the first part of the Tomcat JAAS tutorial series, as stated in the beginning of this article. If you need to re-check some information on this elements it's recommended to read that other tutorial first.
The login-config element contains the form based authentication configuration which is in fact very self-explanatory: In auth-method we configure the login method we want to implement. Since we are looking for form based authentication we choose FORM.
The form-login-page defines which page contains the login form. This login form will be presented to the end user when he tries to access a secure resource (in this case it's anything inside /admin folder).
Obviously the form will only be presented to the end user if he is not yet authenticated within the application. Once authentication succeeds the form will not be presented any more until the current session is valid.
The form-error-page element defines the page that will be presented to the end user when authentication is unsuccessful, ie. wrong credentials.
The Login form
As we have seen in application configuration we need a login form. Let's define a simple page to hold the form:
<!DOCTYPE html>
<html xmlns="http://www.w3.org/1999/xhtml">
<head>
  <title>Login</title>
</head>
<body>
  <form method=post action="j_security_check" >
    <p>
      <span>Username:</span>
      <br />
      <input type="text"  name= "j_username" >
    </p>
    <p>
      <span>Password:</span>
      <br />
      <input type="password"  name= "j_password" >
    </p>
    <p>
      <input type="submit" value="Login">
    </p>
  </form>
</body>
We defined a simple login form with two input fields: username and password. Important things to note here are the form action - j_security_check - and the username and password input name attributes - j_username and j_password.
These are standard for Java web application security. Basically the servlet container will expect the login requests to be POSTED to /j_security_check and the username and password values to be passed as j_username and j_password parameters respectively.
So we have implemented a simple form that will be presented to the end user when he tries to access a secure resource for the first time.
Save this file as:
/login.html
The error page
Now we define a simple error page that will be presented to the end user when authentication fails:
<!DOCTYPE html>
<html xmlns="http://www.w3.org/1999/xhtml">
<head>
  <title>Login failed</title>
</head>
<body>
  <span>Login failed</span>
</body>
Save this file as:
/error.html
The welcome page
Finally let's define the secure resource we will try to access in order to show the working authentication mechanism presented in this tutorial:
<?xml version="1.0" encoding="UTF-8" ?>
<%@ page language="java"
  contentType="text/html; charset=UTF-8"
    pageEncoding="UTF-8"%>
<!DOCTYPE html>
<html xmlns="http://www.w3.org/1999/xhtml">
<head>
<meta http-equiv="Content-Type"
  content="text/html; charset=UTF-8" />
<title>Welcome</title>
</head>
<body>
<%
String username = request.getRemoteUser();
%>
<span>Hello <%= username %>. This is a secure resource</span>
</body>
</html>
This page presents the user with a welcome message containing his username.
Save this file as:
/admin/admin.jsp
Review the configuration
At this moment you should have a folder structure like the following:
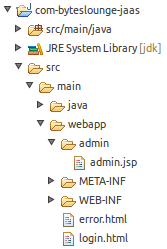
Testing
After deploying the application in Tomcat we try to access the following secure resource:
/admin/admin.jsp
We will be redirected to the login form:
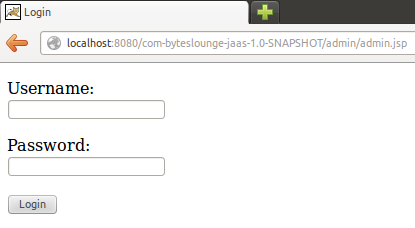
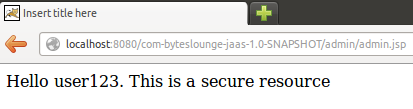
Now we insert the expected credentials: username is user123 and password is pass123. If you are not familiar with these credentials you should read the first part of this tutorial at JAAS authentication in Tomcat example. After the successful login we will be presented the secure resource we are trying to access:
If we inserted instead the wrong credentials we would have been presented with the error page we defined before:
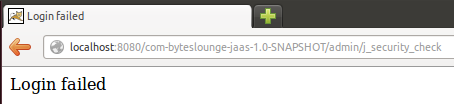
And that's it. The tutorial full source code is available for download at the end of this page.
Logout process
For more information about the user logout process please refer to the following article: