JSF commandButton example
Example usage
We start this article by defining a JSF view containing a simple form. The form submission will be triggered by a commandButton:
<!DOCTYPE html>
<html xmlns="http://www.w3.org/1999/xhtml"
  xmlns:h="http://java.sun.com/jsf/html">
<h:head>
  <title>JSF - commandButton example</title>
</h:head>
<h:body>

  <h:form>
    <h:inputText value="#{testBean.input}" />
    <h:commandButton value="Submit" action="#{testBean.submit}">
    </h:commandButton>
  </h:form>

  <h:outputText value="#{testBean.output}" />

</h:body>
</html>
We are defining a simple form containing an inputText and a commandButton. The commandButton will submit the form when clicked by the user. There is also an outputText that will display the input entered by the user.
The next section will show the bean that will be used to hold both input and output fields and also the submit method.
The bean
We will also need a bean to handle form submission and hold the field's values:
package com.byteslounge.jsf;

import javax.faces.bean.ManagedBean;
import javax.faces.bean.RequestScoped;

@ManagedBean
@RequestScoped
public class TestBean {

  private String input;
  private String output;

  public void submit() {
    // handle form submission
    output = "You submitted: " + input;
  }

  public String getInput() {
    return input;
  }

  public void setInput(String input) {
    this.input = input;
  }

  public String getOutput() {
    return output;
  }

  public void setOutput(String output) {
    this.output = output;
  }

}
Testing
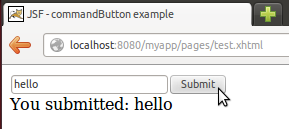
When we access the testing page URL:
http://localhost:8080/myapp/pages/test.xhtml
The following output will be generated

After form submission the user input will be echoed by the server:
The action method
In the previous example the action method doesn't return any value, so the same page will be presented to the user after the form is submitted.
We may change the action method to return a String:
public String submit() {
  // do work
  return "sucess";
}
In this case JSF will search for a view called sucess.xhtml in the same folder as the form view and display it instead. If the target view is not in the same folder as the form view we may return a String containing the path to the target view relative to the application context path.
Keep in mind that the result view will be chosen internally, ie. JSF will pick another view and display it but the client browser will not request the new page.
If we wish to send a redirect to the client browser forcing it to request the new page we must change the action method like the following:
public String submit() {
  // do work
  return "sucess?faces-redirect=true";
}
The faces-redirect=true parameter will instruct JSF that it must issue a redirect to the client browser. Note that this parameter will not be included in the redirect URL sent to the client. It's just used internally by JSF.
commandButton types
commandButton has an attribute named type.
<h:commandButton value="Submit" action="#{testBean.submit}" type="submit">
</h:commandButton>
If type attribute is omitted JSF will use submit as the default. As the name states, a commandButton with type submit will be rendered as an HTML input with type submit:
<input type="submit" name="j_idt5:j_idt8" value="Submit" />
Other possible values for type attribute are button and reset that will in turn render HTML inputs of type button and reset respectively.