JSF Flow example
Introduction
Java EE 7 brought the concept of flows into JSF. A flow may be defined as a contained set of pages (or views) that define a unit of work. As an example of a JSF flow we may consider a checkout process, where a user may introduce its billing details, followed by the shipping address in a subsequent flow step, and finally being presented with a confirmation page in the last flow step.
Flows have a proper scope - FlowScoped - where the CDI container also plays an important role: it will be the manager of flow scoped beans. Speaking of CDI we may also mention that the new flow scope was also introduced in Java EE 7.
The flow scope determines that beans created within this scope will live through the entire lifetime of the flow itself. As soon as a bean is referenced within a flow, the CDI container will create a new instance and use it through the flow duration. As soon as the flow comes to an end, the flow scoped beans will be discarded.
If designed properly, a flow may be implemented as a reusable component that may be included in multiple applications.
Some JSF Flow properties:
- Flows consist in a sequence of pages that represent a unit of work
- Flows may create sub-flows and pass parameters into them
- Flows are configured within the convention over configuration paradigm
- Flows may also be configured through Java configuration
This tutorial considers the following environment:
- Ubuntu 12.04
- JDK 1.7.0.21
- Glassfish 4.0
Flow configuration
In this article we will create a simple flow that will represent the entire process of placing an order within an online store. It will consist in the following steps:
- Select the quantity of items to purchase
- Provide the shipping address
- Display a confirmation page
JSF flows follow the convention over configuration paradigm. Our flow will be called order and the project's folder structure will be the following:
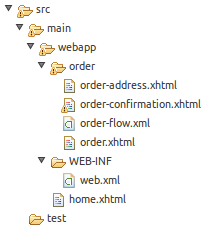
You may have already noticed that we are using a Maven project structure. The flow containing folder must be named with the exact same name of the flow itself and placed in the root of the web content folder (in our example the flow containing folder is named order in order to match the flow name).
The flow configuration file must be named [flow_name]-flow.xml so our example flow configuration file is order-flow.xml.
The flow starting page must be named with the same name of the flow itself: order.xhtml. We will use this page as the one where the user inserts the quantity of items she wants to buy s this will be the first flow step.
The shipping address step will be defined by order-address.xhtml and the confirmation page will be defined by order-confirmation.xhtml.
Our flow configuration file is very simple and looks like the following:
<faces-config version="2.2"
  xmlns="http://xmlns.jcp.org/xml/ns/javaee"
  xmlns:xsi="http://www.w3.org/2001/XMLSchema-instance"
  xsi:schemaLocation="http://xmlns.jcp.org/xml/ns/javaee
  http://xmlns.jcp.org/xml/ns/javaee/web-facesconfig_2_2.xsd">

  <flow-definition id="order">

    <flow-return id="returnFromOrderFlow">
      <from-outcome>#{orderBean.returnValue}</from-outcome>
    </flow-return>

  </flow-definition>

</faces-config>
Since we are defining a very simple flow (ex: without sub-flows) the configuration file becomes also very simple. The top configuration element is flow-definition, which identifier is naturally the name of the flow we are configuring: order.
We only need to define the flow-return element, that configures the flow termination: The element identifier is returnFromOrderFlow and represents the action that will be submitted by a JSF command that will terminate flow execution.
Element from-outcome determines the view where the user will navigate into after flow termination.
FlowScoped CDI bean
As we have said before, flow scoped beans should be used in order to hold data that will be needed across the entire flow. We will need to collect both the item quantity and shipping address through our flow, so a possible flow scoped bean definition may look like the following:
package com.byteslounge.flow.order;

import javax.faces.flow.FlowScoped;
import javax.inject.Named;

@Named
@FlowScoped("order")
public class OrderBean {

  private int itemCount;
  private String address;

  public int getItemCount() {
    return itemCount;
  }

  public void setItemCount(int itemCount) {
    this.itemCount = itemCount;
  }

  public String getAddress() {
    return address;
  }

  public void setAddress(String address) {
    this.address = address;
  }

  public String getReturnValue() {
    return "/home";
  }

}
We have defined a couple of properties to hold our example flow data: itemCount and address. Note the bean scope: FlowScoped. It's the new CDI flow scope. It must be accompanied with a value that, once again, must match the flow name: order.
Finally we defined the method that will be called upon flow termination in order to obtain the view where the user should navigate into: in our case it will translate to home.xhtml. See the above XML configuration we did in the previous section: flow outcome is determined by #{orderBean.returnValue}.
The JSF flow views
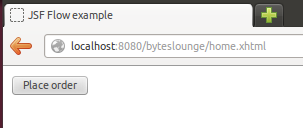
Now we will define the views that compose our flow. Actually the first view that will be presented to the user is not within the flow itself, but will provide a command button that will trigger the flow start:
<!DOCTYPE html>
<html xmlns="http://www.w3.org/1999/xhtml"
  xmlns:h="http://java.sun.com/jsf/html"
  xmlns:f="http://java.sun.com/jsf/core">
<h:head>
  <title>JSF Flow example</title>
</h:head>
<h:body>
  <h:form>
    <h:commandButton value="Place order" action="order" />
  </h:form>
</h:body>
</html>
The command button action value must have the same name of the flow: order. As soon as the user clicks the "Place order" button, the flow will be started.
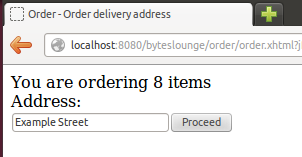
When the user enters the flow, it will be presented with the first flow view (the one which name is the exact same name of the flow: order.xhtml):
<!DOCTYPE html>
<html xmlns="http://www.w3.org/1999/xhtml"
  xmlns:h="http://java.sun.com/jsf/html"
  xmlns:f="http://java.sun.com/jsf/core">
<h:head>
  <title>Order - Selected item quantity</title>
</h:head>
<h:body>
  <h:form>
    <h:outputText value="Item quantity: " />
    <br />
    <h:inputText value="#{orderBean.itemCount}" />
    <br />
    <h:commandButton value="Proceed" action="order-address" />
  </h:form>
</h:body>
</html>
We have an input that will be bound to the itemCount bean property where the user will insert the desired item quantity.
We also have a command button ("Proceed") which action value is the next step within the flow: order-address.

As soon as we define the item quantity and click the "Proceed" button, we will navigate to the next flow step: the shipping address (order-address.xhtml):
<!DOCTYPE html>
<html xmlns="http://www.w3.org/1999/xhtml"
  xmlns:h="http://java.sun.com/jsf/html"
  xmlns:f="http://java.sun.com/jsf/core">
<h:head>
  <title>Order - Order delivery address</title>
</h:head>
<h:body>
  <h:form>
    <h:outputText value="You are ordering #{orderBean.itemCount} items" />
    <br />
    <h:outputText value="Address: " />
    <br />
    <h:inputText value="#{orderBean.address}" />
    <h:commandButton value="Proceed" action="order-confirmation" />
  </h:form>
</h:body>
</html>
Here the user will insert the shipping address that will be bound to the address flow scoped bean property.
Note that we are displaying the item quantity that was inserted in the previous flow step. The flow scoped bean instance is being preserved across flow steps.
Similarly to the previous step, we also have a command button ("Proceed") that will take the user to the next step: order-confirmation.
Note the item quantity defined in the previous step being preserved in the flow scoped bean.
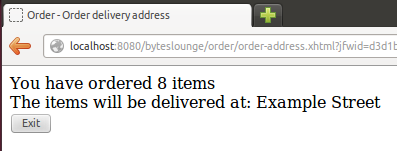
Finally, when we click the "Proceed" button, we will navigate to the last flow step: the confirmation page (order-confirmation.xhtml):
<!DOCTYPE html>
<html xmlns="http://www.w3.org/1999/xhtml"
  xmlns:h="http://java.sun.com/jsf/html"
  xmlns:f="http://java.sun.com/jsf/core">
<h:head>
  <title>Order - Confirmation</title>
</h:head>
<h:body>
  <h:form>
    <h:outputText value="You have ordered #{orderBean.itemCount} items" />
    <br />
    <h:outputText
      value="The items will be delivered at: #{orderBean.address}" />
    <br />
    <h:commandButton value="Exit" action="returnFromOrderFlow" />
  </h:form>
</h:body>
</html>
Here we display both the item quantity and the shipping address defined by the user in the previous steps. Once again the flow scoped bean instance is being preserved through the flow execution.
The presented command button ("Exit") now has an action value of
Our flow scoped bean is returning "/home" in getReturnValue() method, so the user will navigate to this view after flow termination (in our case it will be translated to home.xhtml).
When we click the "Exit" command button we will navigate again to home.xhtml. The flow will be terminated and consequently the flow scoped bean instance that was associated with the flow will be discarded by the container.
We have successfully implemented a JSF Flow.
The source code of this example may be downloaded at the end of this page.
Further reading on JSF Flows
We will cover other JSF flow related subjects in subsequent articles on this website, namely sub-flow creation and flow configuration through Java.
Reference
FlowScoped (Java(TM) EE 7 Specification APIs)
The Java EE 7 Tutorial:Using Faces Flows | Java EE Documentation
A Realistic JSF 2.2 Faces Flows Example (The Aquarium)