Java EE HTML5 WebSockets Encoder and Decoder example
Introduction
As we have seen in previous examples a ServerEndpoint is the Java EE implementation of the server-side HTML5 websocket component:
Java EE HTML5 WebSocket example
Java EE HTML5 WebSockets with multiple clients example
In those previous examples the implemented ServerEndpoint received and sent messages in plain text format. What if we want to bind this textual information to complex Java objects? The Java EE WebSockets API includes a couple of components for this exact purpose: Encoders and Decoders.
Encoders are used to transform a complex Java object sent by a ServerEndpoint in a format that will be understood by the client. Example: XML, JSON, Binary or some other custom format.
Decoders implement the reverse task: They transform textual or binary data sent by clients into complex Java objects ready to be passed into a given ServerEndpoint.
In this tutorial we will implement a simple Encoder - and the respective Decoder - in order to convert messages sent by clients in JSON format into a Java object representation (and vice-versa).
This tutorial considers the following environment:
- Ubuntu 12.04
- JDK 1.7.0.21
- Glassfish 4.0
WebSocket server endpoint
Following next is the ServerEndpoint used in this example:
package com.byteslounge.websockets;

import java.io.IOException;

import javax.websocket.EncodeException;
import javax.websocket.OnClose;
import javax.websocket.OnMessage;
import javax.websocket.OnOpen;
import javax.websocket.Session;
import javax.websocket.server.ServerEndpoint;

@ServerEndpoint(
  value = "/websocket",
  encoders = { MessageEncoder.class },
  decoders = { MessageDecoder.class }
)
public class WebSocketTest {

  @OnMessage
  public void onMessage(Message message, Session session)
      throws IOException, EncodeException {

    // Echo the received message back to the client
    Message response = new Message();
    response.setSubject("Response to " + message.getSubject());
    response.setContent("echo " + message.getContent());
    session.getBasicRemote().sendObject(response);

  }

  @OnOpen
  public void onOpen() {
    System.out.println("Client connected");
  }

  @OnClose
  public void onClose() {
    System.out.println("Connection closed");
  }

}
We have introduced some changes into this server endpoint when compared to the ones we defined in the previous tutorials.
Method onMessage is now receiving a parameter of type Message instead of receiving a String (we will see the Message class in a few moments). This same method now writes an object - also of type Message - directly to the connected client.
We are now declaring encoders and decoders in the type level @ServerEndpoint annotation. They will be used to convert messages received from the clients in a specific text format into instances of type Message (and vice-versa).
The Message class
Now we define the Message class we used in the previously defined ServerEndpoint:
package com.byteslounge.websockets;

public class Message {

  private String subject;
  private String content;

  public String getSubject() {
    return subject;
  }

  public void setSubject(String subject) {
    this.subject = subject;
  }

  public String getContent() {
    return content;
  }

  public void setContent(String content) {
    this.content = content;
  }

}
This class is just a simple POJO that represents a message received by a connected client. It contains a subject and the message content itself. It will be also used to represent server responses sent to clients.
The Encoder
In this example the connected clients will be expecting messages sent by the server to be in JSON format. Since our ServerEndpoint is directly sending instances of type Message we must define an Encoder to convert them into a JSON String:
package com.byteslounge.websockets;

import javax.json.Json;
import javax.json.JsonObject;
import javax.websocket.EncodeException;
import javax.websocket.Encoder;
import javax.websocket.EndpointConfig;

public class MessageEncoder implements Encoder.Text<Message> {

  @Override
  public String encode(Message message) throws EncodeException {

    JsonObject jsonObject = Json.createObjectBuilder()
        .add("subject", message.getSubject())
        .add("content", message.getContent()).build();
    return jsonObject.toString();

  }

  @Override
  public void init(EndpointConfig ec) {
    System.out.println("MessageEncoder - init method called");
  }

  @Override
  public void destroy() {
    System.out.println("MessageEncoder - destroy method called");
  }

}
Since we defined this encoder to be used in our ServerEndpoint all messages sent by the endpoint will go through the encoder. The encoder takes the Message instance sent by the endpoint and converts it into JSON format.
The encoder must implement the javax.websocket.Encoder interface. The implemented interface methods are kind of self-explanatory.
The Decoder
Now we need a decoder, ie. the component that will receive JSON messages from connected clients and convert them into Message instances:
package com.byteslounge.websockets;

import java.io.StringReader;

import javax.json.Json;
import javax.json.JsonObject;
import javax.websocket.DecodeException;
import javax.websocket.Decoder;
import javax.websocket.EndpointConfig;

public class MessageDecoder implements Decoder.Text<Message> {

  @Override
  public Message decode(String jsonMessage) throws DecodeException {

    JsonObject jsonObject = Json
        .createReader(new StringReader(jsonMessage)).readObject();
    Message message = new Message();
    message.setSubject(jsonObject.getString("subject"));
    message.setContent(jsonObject.getString("content"));
    return message;

  }

  @Override
  public boolean willDecode(String jsonMessage) {
    try {
      // Check if incoming message is valid JSON
      Json.createReader(new StringReader(jsonMessage)).readObject();
      return true;
    } catch (Exception e) {
      return false;
    }
  }

  @Override
  public void init(EndpointConfig ec) {
    System.out.println("MessageDecoder -init method called");
  }

  @Override
  public void destroy() {
    System.out.println("MessageDecoder - destroy method called");
  }

}
As we can see the decoder converts a JSON textual message into an instance of type Message. After this step the message will finally be delivered to the ServerEndpoint in the expected format.
The decoder must implement the javax.websocket.Decoder interface.
The method willDecode is called previously than decode method and is used to determine if the message should really be decoded. In this example we are just checking if the message sent by the client is valid JSON.
All other methods are kind of self-explanatory.
Client side
Now we need to write the client-side of our test application:
<!DOCTYPE html>
<html>
<head>
<title>Testing websockets</title>
</head>
<body>
  <div>
    <span>Subject:</span>
    <input id="subject" type="text" />
    <br />
    <span>Content:</span>
    <input id="content" type="text" />
  </div>
  <div>
    <input type="submit" value="Send message" onclick="send()" />
  </div>
  <div id="messages"></div>
  <script type="text/javascript">
    var webSocket =
      new WebSocket('ws://localhost:8080/byteslounge/websocket');

    webSocket.onerror = function(event) {
      onError(event);
    };

    webSocket.onopen = function(event) {
      onOpen(event);
    };

    webSocket.onmessage = function(event) {
      onMessage(event);
    };

    function onMessage(event) {
      var json = JSON.parse(event.data);
      document.getElementById('messages').innerHTML
        = '<br />Received server response!'
        + '<br />Subject: ' + json.subject
        + '<br />Content: ' + json.content;
    }

    function onOpen(event) {
      alert('Connection established');
    }

    function onError(event) {
      alert('Error');
    }

    function send() {
      var subject = document.getElementById('subject').value;
      var content = document.getElementById('content').value;
      var json = {
        'subject' : subject,
        'content' : content
      };
      webSocket.send(JSON.stringify(json));
      return false;
    }
  </script>
</body>
</html>
Similarly to what we have done in the previous tutorials - as stated in this article Introduction section - we will use this sample page in order to interact with our ServerEndpoint.
There are two input fields, one for inserting the message subject and the other for inserting the message content.
When the user presses the "Send message" button the input fields content will be converted into a textual JSON message and sent through the websocket. The ServerEndpoint together with the Encoder and the Decoder will produce a message response and send it back to the client.
Finally the message received from the server in JSON format will be processed by the client and presented to the user.
Testing
Now we deploy the application and access the following URL:
http://localhost:8080/byteslounge/page.html
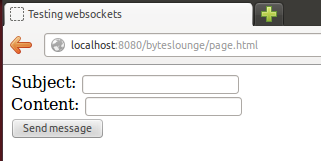
The following page will be presented:
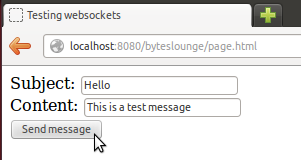
Now we fill the details and press the Send button:
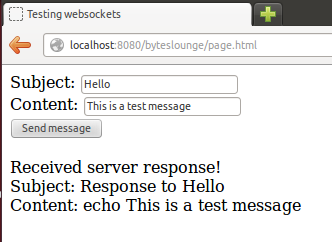
We will receive the response from the server:
Conclusion
As we have seen Encoders and Decoders are very convenient to convert messages in some format that the client understands into Java objects of arbitrary complexity. The message exchanging format may be whatever format that suits your needs.
In this concrete example we used JSON but you may use any other format like XML or even a completely custom format. Even pure binary messages may be used but that will be covered in another tutorial.
Downloadable sample
The example source code is available for download at the end of this page. The test was executed in Glassfish 4 (you will need a Java EE 7 compliant application server).